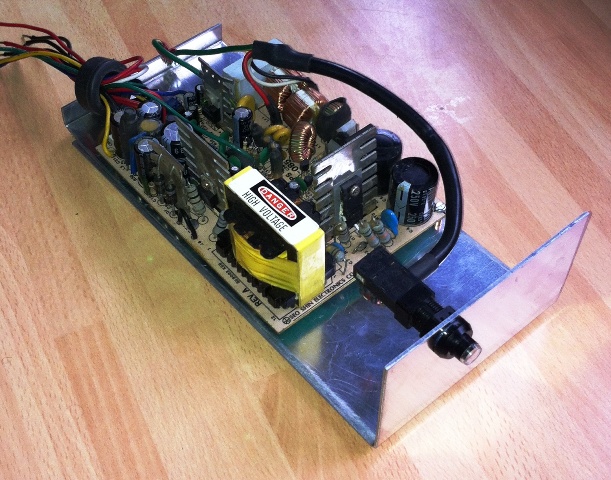
This, at long last, has now been completed. The solution was to mount the innards of an old PC-AT Power Supply on a recreated Tangerine power supply chassis. The nearest guage aluminium I had was 2mm (the original is 13 AWG - 1.829mm thick). So that the edges would slide in the plastic guide rails, they needed to be filed down a little (see photo below). The sketch drawing for the chassis is here.
The footprint of the new power supply board was slightly smaller than the Tangerine MPS IIA but delivering more than double the power. Here is a photo of the finished article:
This modification was to enable both RS232 and TTL level connections using the Serial Option. Instead of documenting this modification I decided to return the Tanex card to its original configuration. Any conversion from RS232 to TTL can be achieved by using external circuitry instead. However I did notice some errors in the Tanex Circuit Diagrams I had on file, so I updated both the schematic for the original design as used in my Micron and the one for the Issue 2 card used in my Full System.
This had become more than an occasional problem with the 64K RAM card installed. Conducted search through MT65 and TANEX user manuals. Nothing there so moved to the TANDOCs. There in TANDOC 3 I found the answer. A note says: "If serial option installed, a header must be fitted to socket E1 on TANEX connecting pins 8, 10 and 11 to +5v via a 10K resistor, this will prevent the system hanging up."
I only had a 16 pin header but there's enough room for it to overhang. This is what it looks like:

No further lockups experienced. Job done.
Opening up the keyboard was a bit of a surprise. I had forgotten that I had completely gutted the Apple Keyboard, removing the PCB and wired up my own matrix of keyboard switch connections. These connected into a KB3600 keyboad chip, the output of which fed into a 2716 EPROM, programmed to give a full range of ASCII codes from the various Apple keyboard key-press combinations. A separate cable and Microtan front-panel connector from the KB3600 had been made up for testing purposes.

There was no problem found with the E0 EPROM. It looked as it was one of the pins had not been located properly in the socket. The original is back in place fully operating as expected.
Over time I discovered this was not just the disk system playing up. When conducting long screen dumps using the command "L0,0", particulary when the system was well-warmed up, the Microtan would crash. The more I gave the processor to do, the worse it seemed to be. The first thing I did was change the 6502 processor on the MT65 to see if that improved the situation. It did, and I haven't had any more intermittent crashes since then. This may have been why I gave up finally on the Microtan all those years ago.
Then, a couple of weeks ago (2013 New Year)my Amstrad Drives stopped working. The drives wound up but there was no sound of the heads moving. After a while they timed out and the Microtan reported "00 Hard Error, No Drive?"
I swapped the drives with ones from my 6509 system. These had 2 JVC (MSHF200B81) drives. These gave me just the first page of the directories, so suspected they were set to 80 tracks. Some fiddling with their configuration jumpers reverted them back to 40 tracks. This time they gave the full directory although I did subsequently find one of them had difficulty writing to the inner tracks. The head sliders may need loosening up near the centre.
This week, after swapping cables, I established the problem with my original drives lay with the drives themselves. It was obvious the SYS file on Drive 0 could not be found. So I tried moving the starting position of the head. When the starting position was inside Track 0, ie nearer the centre, it found it straight away. However if the starting position was outside Track 0, ie as I found it at its furthest out position, it did not move at all. This was the problem. I've no idea how they got themselves into that state. The drive system is now all back together again and working. Time will tell if there is any further unreliability.
Supplement - 17 August 2014
After running with the 'fixed' drives for a year or so, I was still having intermittent problems. So I decided to give the Tandos system a complete overall.
First I checked the Tandos board itself, checking for dry joints, potential solder bridges and that I had implemented the modifications recommended in ?? ie upgrading with faster chips. I then noticed I had an incorrect value capacitor C1 fitted. I took out the 10nF and replaced it with a 100pF. C1 is part of the clock circuit so having the incorrect value will have certainly had an impact on its performance.
Next I checked the cables. The drive connectors were a little slack so I replaced them with new ones. The edge board connectors on the drives were also a little dirty so cleaned them up with switch cleaner.
I then checked the moving parts for each of the 5.25 floppy disc drives I have and cleaned their heads using a cleaning disc obtained off the internet.
Finally I checked my discs using the Disk Check program I developed . Many of them needed corrective action using DZAP but was able to recover a full set of the programs / files I wanted with backups. During this process I put aside 2 of the drives for further investigation and installed 2 for the Microtan system and 2 for the 6809 system which gave no problems.
This has now been completed. Right click and download from here and here